Ads Manager overview
Ads Manager lets you create ad campaigns, manage your ad creative, and monitor performance. This guide will walk you some of your first steps: from creating a campaign to uploading your first ads.
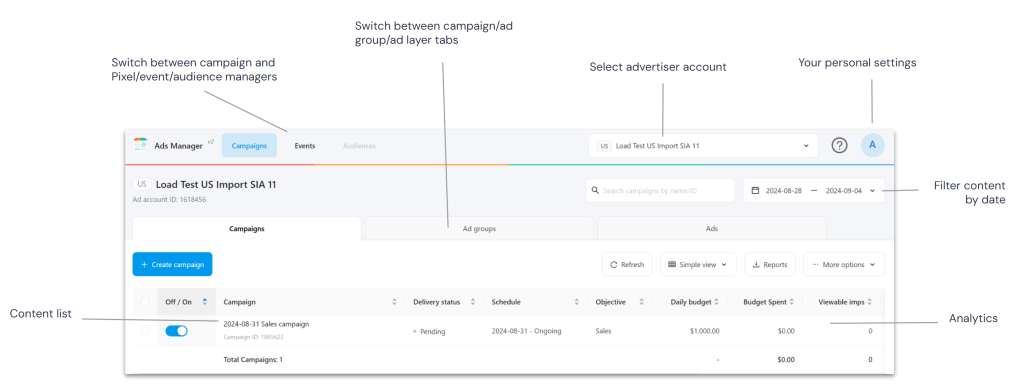
What a typical Ads Manager screen looks like
Create a campaign
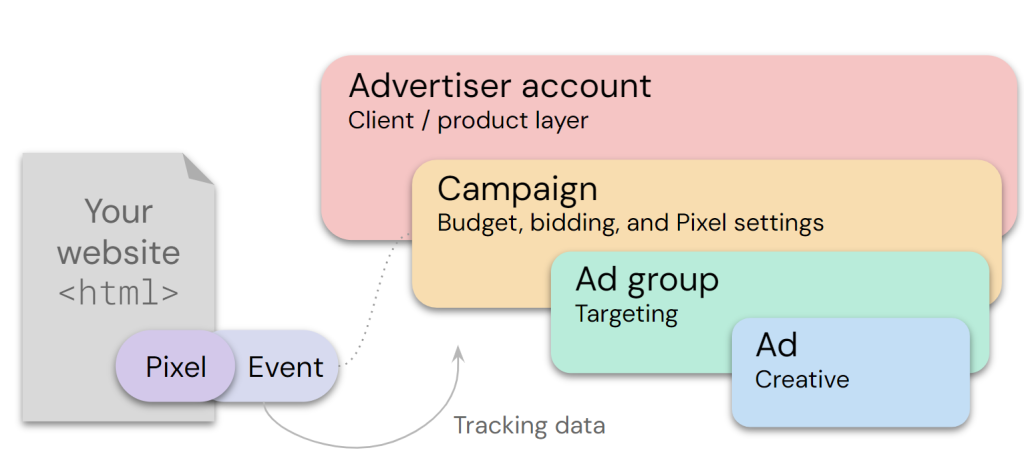
Content in Ads Manager is organized in a hierarchy of Campaign > Ad group > Ad. Each level has its own tab, analytics reports, and configuration settings.
1Begin by selecting Create campaign under the Campaigns tab.

2Next, select a campaign objective for the new campaign. Different objectives offer unique optimization and tracking options.
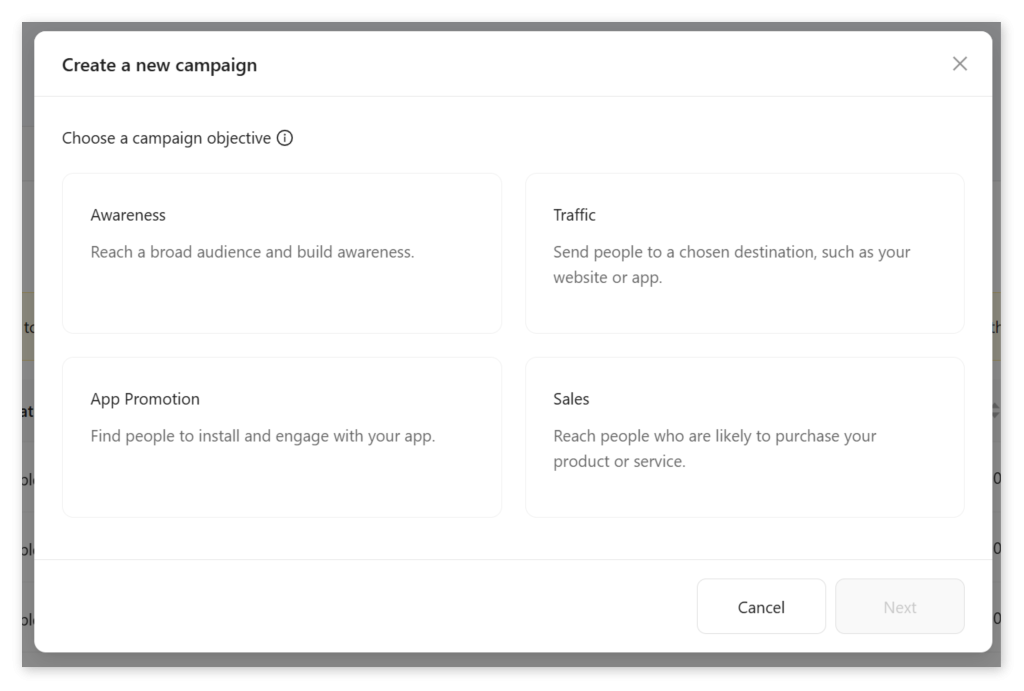
Campaign objectives
Awareness
- Optimize your campaign to reach the widest possible audience. This objective helps you expand your customer base.
Traffic
- A simple and flexible objective; tracks user clicks from the links in your ads. Optionally supports event tracking using Pixel event codes.
App Promotion
- An objective optimized for app installs and engagement. Select this objective to connect your campaign with your app’s store ID and incorporate tracking data from Adjust,AppsFlyer, or Singular.
Sales
- Use Pixel event codes added to your website to track detailed user behavior.
Configuring your campaign
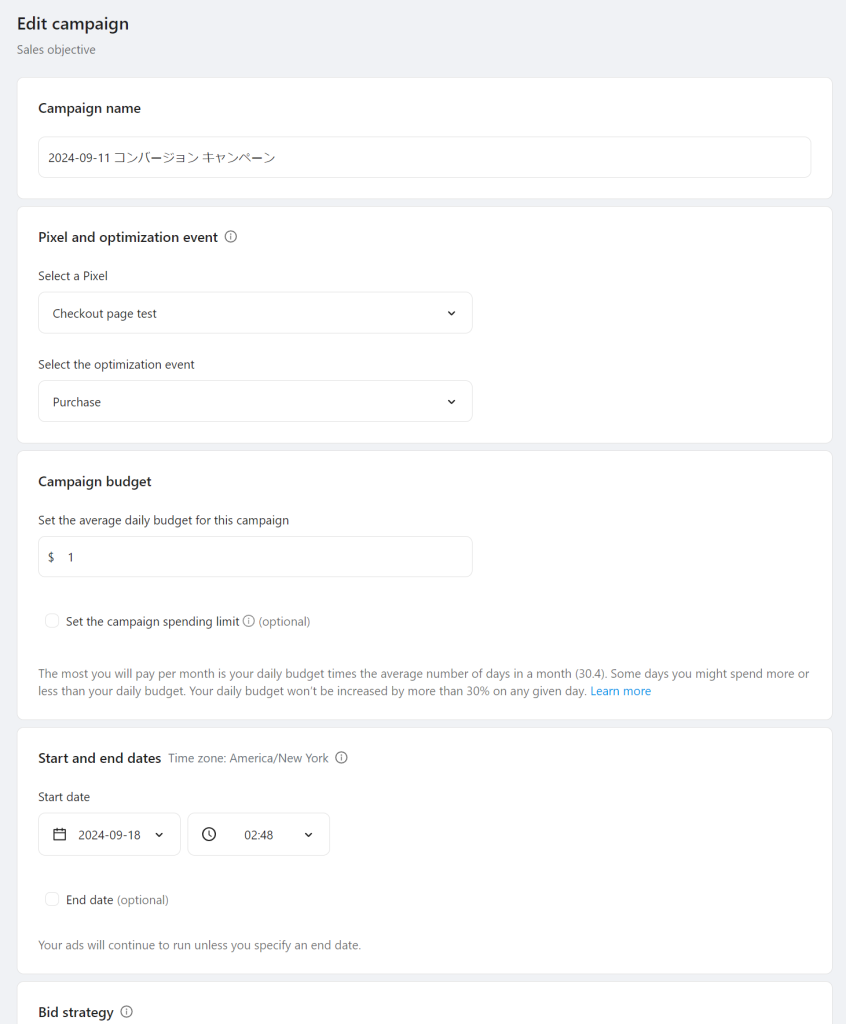
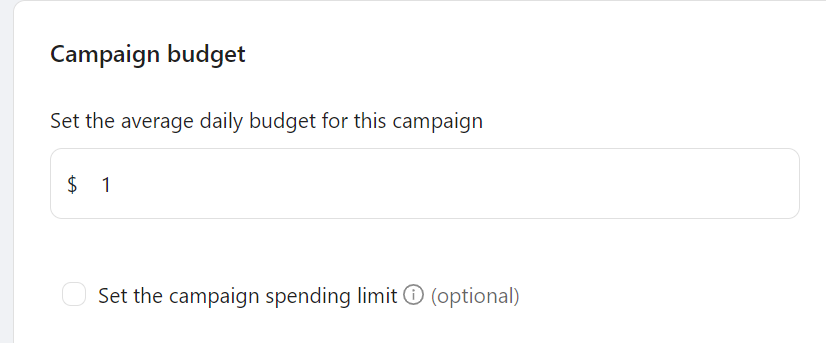
1Enter a name for your campaign and set a daily budget (more details below) and delivery schedule.
For Sales campaigns, you’ll have to first create a Pixel to track user behavior on your website from your SmartNews ads.
2Select Save and continue. You’ll automatically be taken to the ad group creation screen.
Budget settings
SmartNews Ads manager calculates your monthly budget based on your daily budget multiplied by the average number of days in a week (30.4).
By entering an average daily budget of $100, your campaign will never spend more than $100 multiplied by the number of days in the month. In this example, SmartNews also won’t spend more than $130 in a single day.
SmartNews will automatically increase your daily budget by up to 30% or $30 (whichever is higher) to take advantage of days when conversions are expected to be higher. This billing adjustment is calculated at the end of each month.
Changing your budget during a campaign
When you change your daily budget midway in the month, your new monthly spending limit is calculated by adding two amounts: the money already spent that month, plus your new daily budget multiplied by the remaining days in the month.
For example, if you raise your daily budget from $100 to $120 on January 15, your new spending limit will follow the formula:

Campaign spending limit
You can choose to set a lifetime campaign spending limit in addition to the monthly limit set above. This can be used to stop a campaign early before your monthly limit is reached.
- Your final daily billing is based on the highest daily budget set at any point during the day.
This means that making frequent changes to your campaign budget within a day may lead to unexpected charges.
Bid strategy
Bid strategies (Max Conversion and Max Click) offer a way to tailor how you spend your budget. The options shown here will vary based on your selected campaign objective.
Maximize conversions
- By default, SmartNews will automatically adjust your bid to meet your objective based on a combination of machine learning and past ad performance.
Target cost per acquisition
- Use this setting to control your cost per acquisition. It helps maximize conversions regardless of daily budget, leading to better long-term performance.
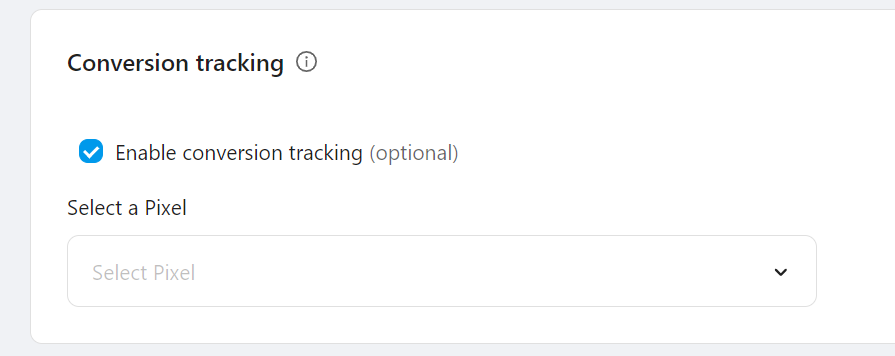
Pixels and conversion tracking
A SmartNews Pixel is a snippet of code that you can easily generate and paste into your website’s page headers (<head></head>). This lets you track user actions on the page, logging your conversions from SmartNews Ads.
Each Pixel has an event tied to it, such as “Purchase” or “Add to cart,” and consists of a base code and an optional event code.
Some campaign objectives, such as Sales, require a Pixel to function. For Traffic campaigns that don’t require Pixels, you can still enable Pixel tracking from More options > Enable conversion tracking.
Learn more about creating and managing Pixels
Creating and managing ad groups
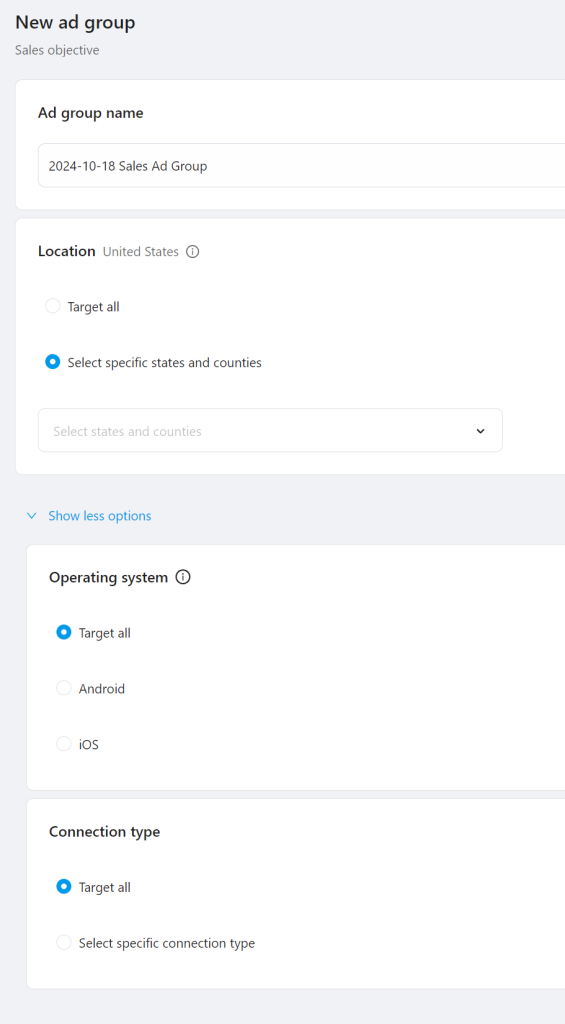
Ad groups let you combine many different ad creatives under one targeting strategy. All ads in Ads Manager are part of an ad group with common targeting settings. You can narrow your targeting settings to specific states and counties and connection types.
Targeting
Each ad group is designed to reach a particular audience segment. The targeting settings you choose in your ad group will be applied to all ads in the ad group.
When you select multiple different targeting settings, such as Location or Operating System, SmartNews will only deliver ads to users who meet all the targeting conditions you select.
This means that the more targeting choices you make, the smaller your potential audience becomes.
Note that SmartNews won’t ever target users who have opted out of targeted advertising.
Location
We determine user location through a combination of app behavior, device telemetry, and user settings. Since location isn’t tracked in real time, location-based targeting may deliver ads to users associated with a region regardless of their device’s current physical location.
Operating system
Choose to restrict ad delivery to only Android or iOS devices.
Connection type
Restrict delivery to 3G, 4G, 5G, or Wi-Fi-connected users. The connection type is determined in real time.
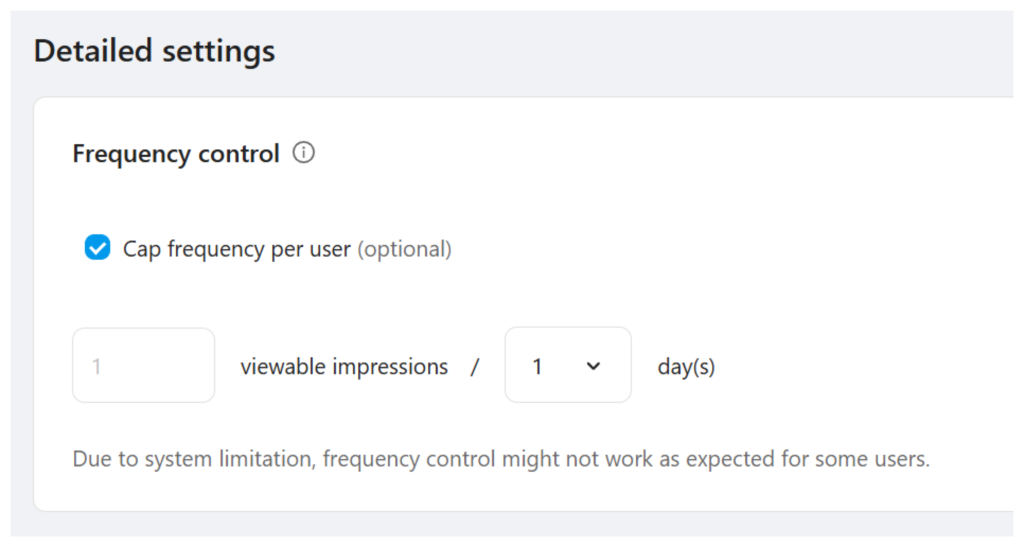
Frequency control
The frequency control setting limits how many times ads from this ad group can be shown to individual SmartNews users.
To enable this feature, select Cap frequency per user and specify the maximum number of daily or weekly impressions allowed per user.
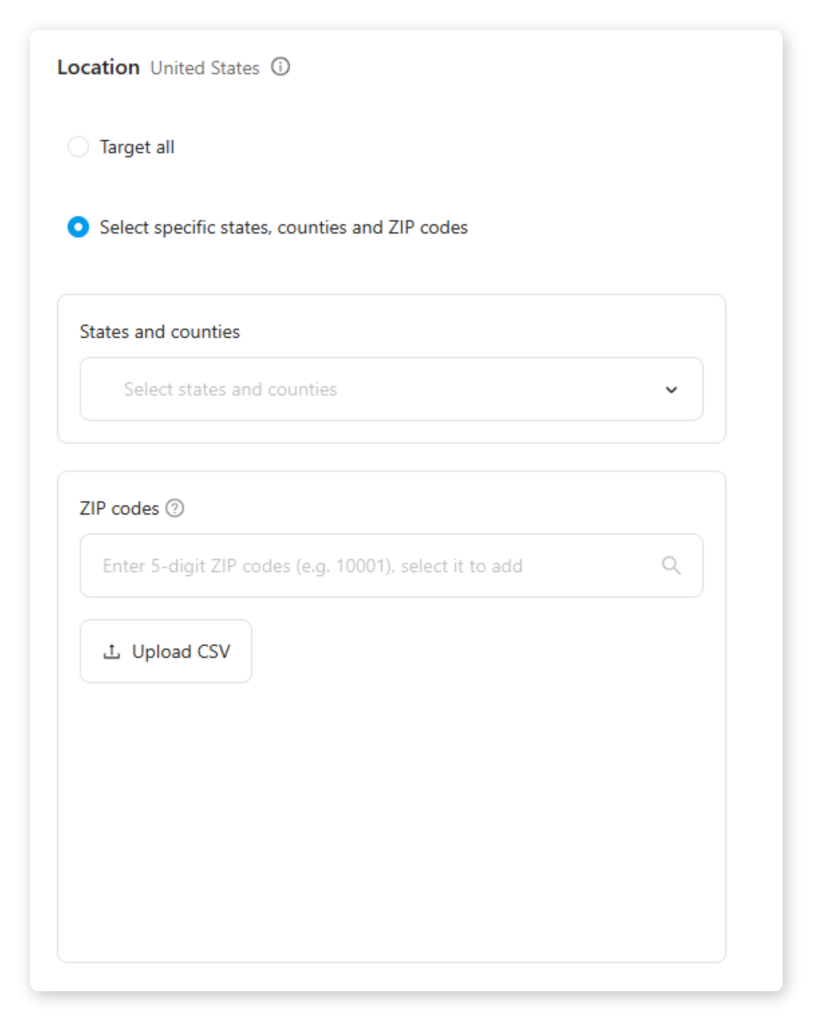
ZIP code targeting
In addition to targeting specific states and counties, you can target individual ZIP codes or upload a list of ZIP codes in CSV format for easy reuse.
Each ad group can target up to 1,000 ZIP codes.
1In your ad group settings under Location, make sure Select specific states, counties and ZIP codes is selected.
2Under ZIP codes, enter multiple 5-digit ZIP codes to add them to your ad group’s targeting list. The ad group will only run ads in the selected ZIP codes.
3Click Save to apply your changes to the ad group.
Uploading ZIP codes
Select the Upload CSV button to bulk upload multiple codes from a prepared CSV file.
CSV format
Make sure your CSV file follows the following single-column format. Your file should have a single zipcode header with values listed below.
| Header | zipcodeYour CSV file must have this header string for the upload to succeed. |
| Values | – 5 digit format is required e.g. 00601, 99929 – Rows cannot be left blank. – All values must be valid US postal codes. |
- Your CSV file cannot have more than 1,000 codes across all rows.
- Any duplicate values in your file will be ignored on upload.
Creating ads and uploading creative
The Ads tab is where you create ads for your ad groups and campaigns. Here, you’ll upload creative assets, enter ad copy, and set click destinations.
Image ads
1Enter the ad headline, description, and sponsor name. This text will appear as ad copy to SmartNews users.
2Upload ad creative files. You’ll need both landscape (1.91:1) and square (1:1) formats. Supported file types are JPG, PNG, or static GIF with a maximum size of 5 MB.
Note: The actual file size limit may be slightly smaller than 5MB in practice. Please leave a slight margin when preparing your creative.
3Enter your landing page URL and click Save.

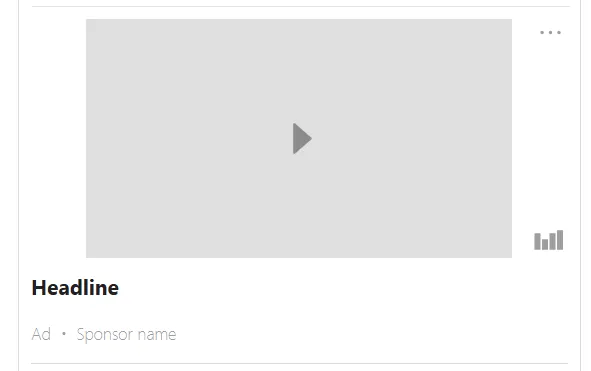
Video ads
1Upload a 16:9 video in MP4 format, no larger than 100 MB. The video must be 1 minute or shorter.
2Upload a 16:9 thumbnail image in JPG or PNG format.
3Enter your landing page URL and click Save.
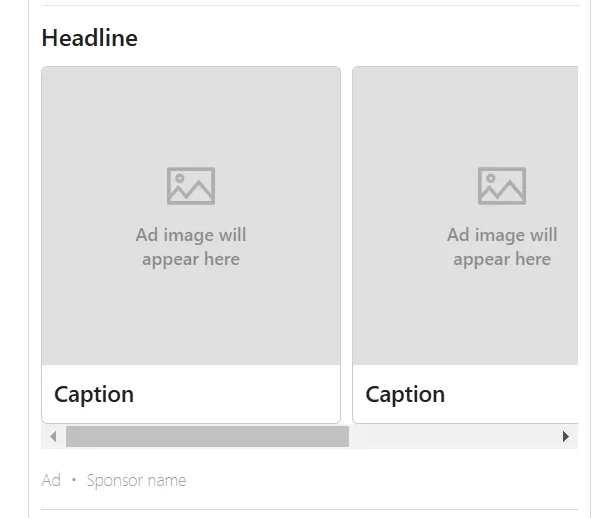
Carousel ads
1Upload at least 3 image files with a 1:1 aspect ratio. Supported file types are JPG, PNG, or static GIFs
2Enter a caption between 5 and 50 characters for each image. This caption will be shown to users below each image.
3Enter your ad’s headline and sponsor name.
4Enter your landing page URL and click Save.
Submitting ads for review
Once you’ve created your ad, you should be ready to submit it for review from the Ads tab.
Once in review, you won’t be able to make any edits to creative or landing pages, so ensure all settings are correct before submitting.
The ad review process usually takes between 2 to 3 business days.

Bulk submitting ads
You can also submit all ads pending review at once from the ad creation screen.
After completing ad creation, click Save in the bottom right of the screen. A bulk submission button will appear that lets you submit all ads eligible for review at once. Note that clicking this button will prevent any further edits to these ads.
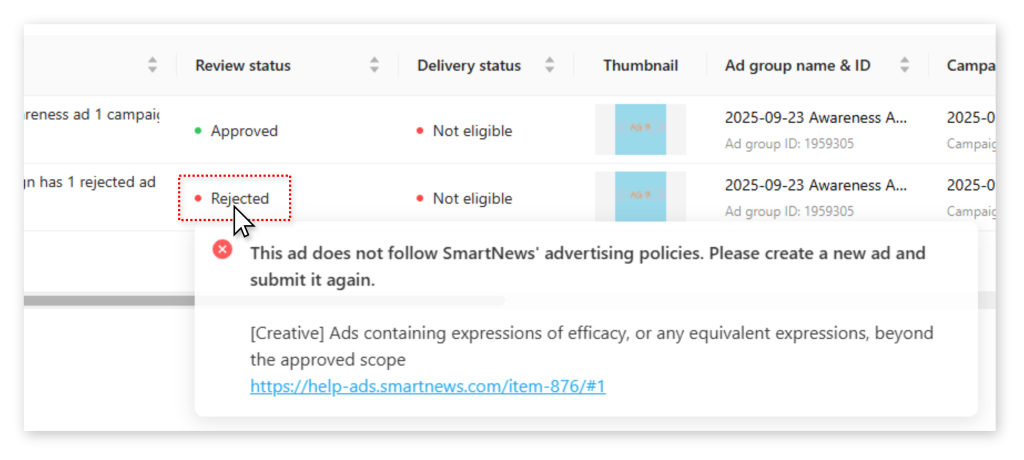
Troubleshooting rejected ads
When an ad’s review status shows “Rejected” on the Ads tab, hover over “Rejected” in the “Review status” column to quickly view the reason.
The tooltip displays the rejection reasons with links to detailed explanations.
Resubmitting ads for review
If your ad doesn’t pass the review process, you’ll receive an email notification listing the affected ads. You can view detailed reasons for an ad’s rejection on the ad settings page.
To resubmit an ad for review:
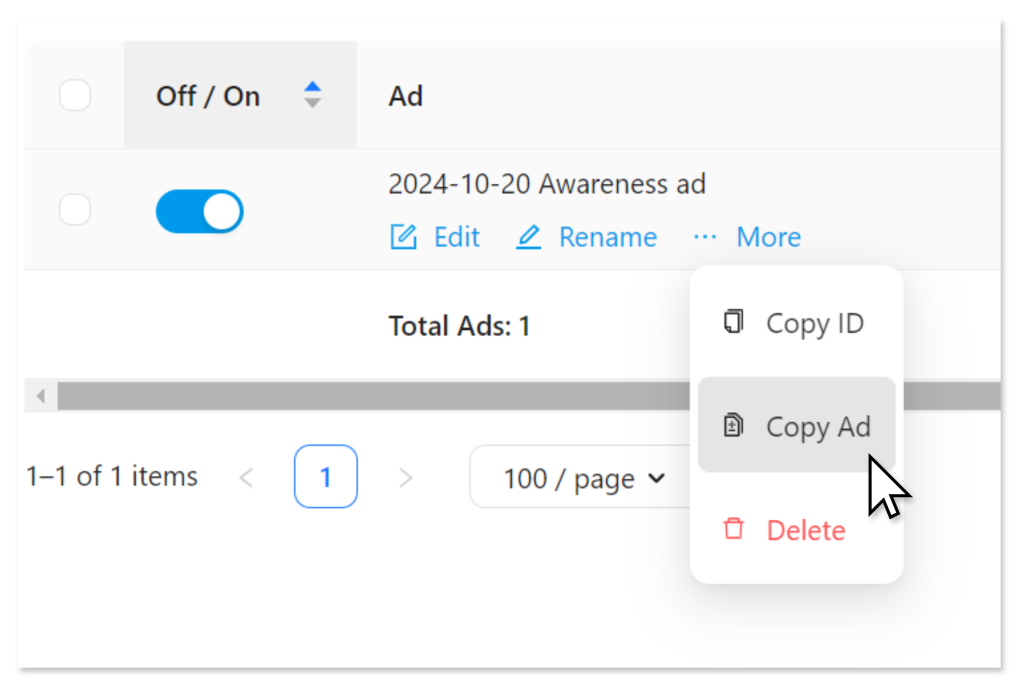
1From the Ads tab, create a new ad using the Copy Ad option under … More.
2Make the necessary changes, then submit the new ad for review.