Overview
SmartNews Pixels are small snippets of code can be added to all of the pages where you wish to track user behavior. You can measure the effectiveness of your conversion funnel and calculate your exact return on investment from SmartNews ads.
General workflow for setting up SmartNews Pixels:
1Create a new Pixel from the Events tab in Ads Manager.
2Set up an event which will be used to track the specific behavior we want to track, for example, “Add to Cart”.
3Add the Pixel’s base code to all the pages where you want to track user behavior.
4Add the event code to the page that will be used to track the behavior, such as the checkout end page. Alternatively, if you wish to track events from a clickable element like a button or link, you can set up events to use a URL configuration instead of an event code.
5We recommend you set up multiple events to track the full funnel of conversions. SmartNews provides a set of 22 standard events right out of the box.
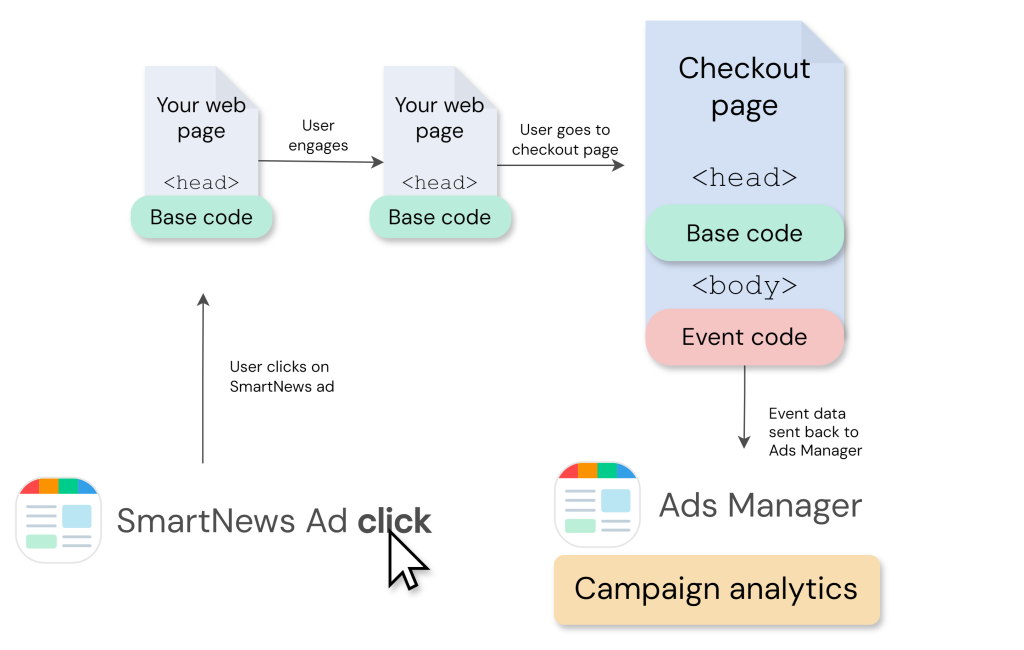
Capturing the checkout conversion funnel with a SmartNews Pixel
Three ways to set up events:
- Add an event code snippet to the <body> section of the web page you wish to track.
- Add an event code snippet together with a Pixel base code to the <head> section of the web page you wish to track.
- Use the URL configuration setting to map an event to your custom URL structure.
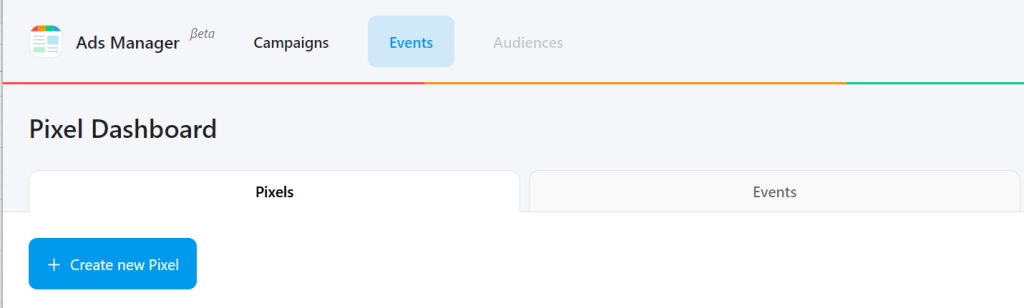
Pixel creation in Ads Manager
1Go to Events tab in Ads Manager and select Create new Pixel.
2Provide a name for your new Pixel.
3Select Download code and have your web development team implement the Pixel base code on your website.
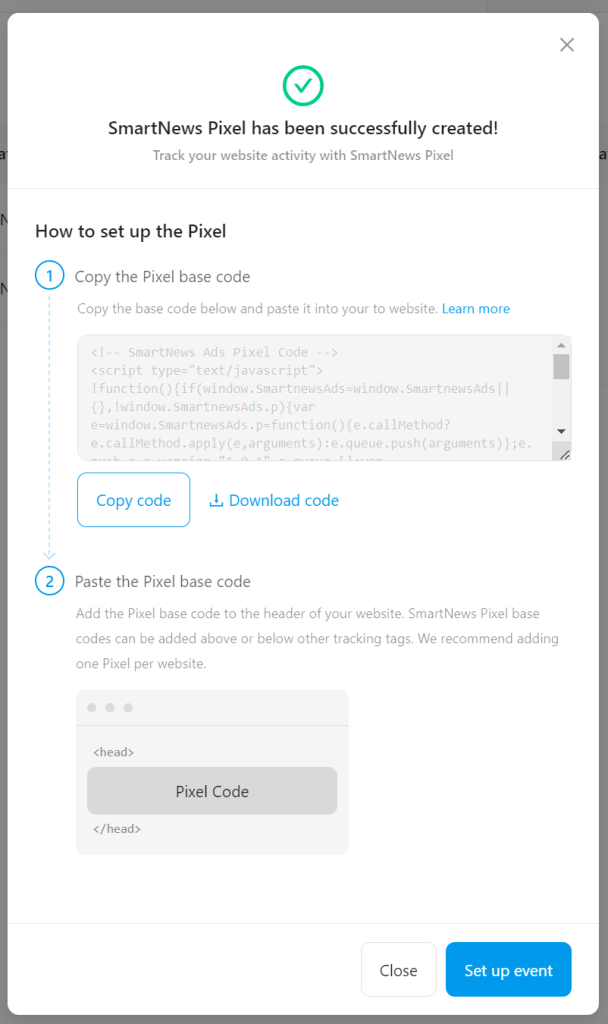
Adding Pixel base codes to your site
The base code should be added to the header section of the advertiser’s website. As a best practice, we highly recommend that you add the Pixel base code between the opening and closing <head> tags on every page where you will be tracking visitor actions. Most companies add it to their website’s persistent header so that it can be used on all pages. Placing the code within the <head> tags also reduces the chances of browsers or third-party code blocking the Pixel’s function.
Finally, it’s best to implement just one set of Pixel codes per website. If you plan to implement more than one set of Pixel codes on a single website, please check with us first.
<!-- SmartNews Ads Pixel Code -->

<script type="text/javascript">

!function(){if(window.SmartnewsAds=window.SmartnewsAds||{},!window.SmartnewsAds.p){var e=window.SmartnewsAds.p=function(){e.callMethod?e.callMethod.apply(e,arguments):e.queue.push(arguments)};e.push=e,e.version="1.0.1",e.queue=[];var n=document.createElement("script");n.async=!0,n.src="//cdn.smartnews-ads.com/i/pixel.js";var s=document.getElementsByTagName("script")[0];s.parentNode.insertBefore(n,s)}}();

SmartnewsAds.p("[pixel ID]", "PageView");

</script>

<noscript>

<img height="1" width="1" style="display:none;" alt="" src="https://i.smartnews-ads.com/p?id=[pixel ID]&e=PageView" />

</noscript>
Setting up event tracking
Three ways to set up events:
- Add the Pixel base code to the <head> section across your website and various event codes on web pages where you wish to track conversion events.
- Add the Pixel base code together with event codes in the <body> section on web pages where you wish to track conversion events.
- Add just the base code to the <head> section and use the Events Manager’s URL configuration tool to set up event tracking.
Adding event codes to your web pages
Add a single line of event code to the web pages where you wish to track conversions. For example, the event code for the Purchase event is SmartnewsAds.p(“[pixel ID]”, “Purchase”). Add this line to pages where customers can make purchases. Here’s an example of a SmartNews Pixel base code with a “Purchase” event:
<!-- SmartNews Ads Pixel Code -->
<script type="text/javascript">
!function(){if(window.SmartnewsAds=window.SmartnewsAds||{},!window.SmartnewsAds.p){var e=window.SmartnewsAds.p=function(){e.callMethod?e.callMethod.apply(e,arguments):e.queue.push(arguments)};e.push=e,e.version="1.0.1",e.queue=[];var n=document.createElement("script");n.async=!0,n.src="https**:**//cdn.smartnews-ads.com/i/pixel.js";var s=document.getElementsByTagName("script")[0];s.parentNode.insertBefore(n,s)}}();
SmartnewsAds.p("**[pixel ID]**", "PageView");
SmartnewsAds.p("**[pixel ID]**", "Purchase");
</script>
<noscript>
<img height="1" width="1" style="display:none;" alt="" src="https://i.smartnews-ads.com/p?id=**[pixel ID]**&e=PageView" />
<img height="1" width="1" style="display:none;" alt="" src="https://i.smartnews-ads.com/p?id=**[pixel ID]**&e=Purchase" />
</noscript>
Use URL configuration to track events
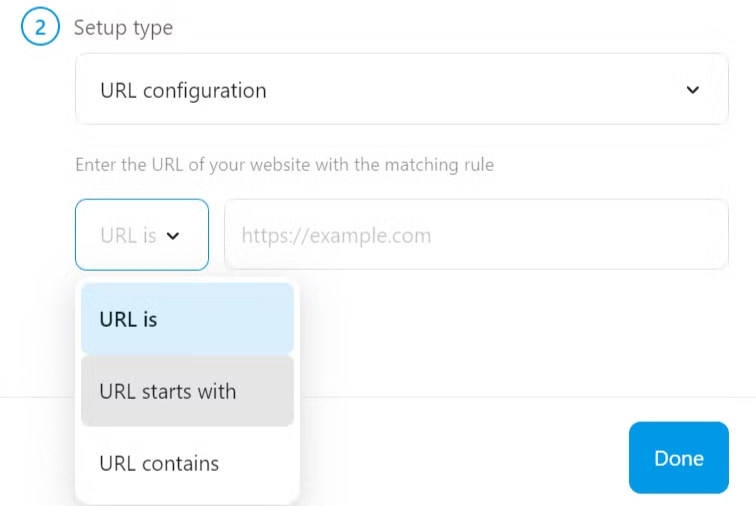
In addition to Pixel event codes, URL configuration can be used to define how an event is tracked. On the event setup screen, select URL configuration and define an URL rule by specifying a URL match type and entering the corresponding URL information.

A unique combination of URL match type and URL can be used to define how a standard event is tracked. Three match types are available:
URL is
- Our system will attempt to do an exact match to the URL provided and record the corresponding event. For example, whenever the exact URL www.domain.com/purchase-complete is loaded, a Purchase event is recorded.
URL starts with
- Any URL that starts with the string of texts provided will trigger this rule. For example, a URL that starts with www.domain.com/search could be used to track the actions of users searching products and going to a search result page if your search result page has the URL format of www.domain.com/search/keywords.
URL contains
- Any URL that contains the entered string will trigger this rule and record the corresponding event.
SmartNews automatically detects the validity of each rule. If two or more rules have conflicting logic, the setup screen displays an error message, and the rule cannot be saved. Once a URL configuration rule is successfully saved, the event and rule appear in the Events tab.
You can edit or remove a URL configuration at any time. If you’ve added a Pixel event code to your website and later decide to switch to a URL configuration rule for the same event, the URL configuration rule will be used to track events in Ads Manager, replacing the event code. If you remove the URL configuration, event tracking will revert to the Pixel event code, provided it’s correctly installed on your website.

SmartNews standard events
Below is a list of 22 standard event types for user behavior tracking available from the Events tab.
Most commonly used event types
| Event name | Recommended properties | Example event code | Event description |
|---|---|---|---|
| AddPaymentInfo | content_ids, contents, currency, value | SmartnewsAds.p(“your pixel tag ID”, “AddPaymentInfo”) | When payment information is added in the checkout flow. Example: Someone clicks on a [Save billing information] button. |
| AddToCart | content_ids, content_type, contents, currency, valuecontent_ids are required for Dynamic Ads | SmartnewsAds.p(“your pixel tag ID”, “AddToCart”) | When a product is added to the shopping cart. Example: Someone clicks on an [Add to cart] button. |
| AddToWishList | content_ids, contents, currency, value | SmartnewsAds.p(“your pixel tag ID”, “AddToWishlist”) | When a product is added to a Wishlist. Example: Someone clicks on an [Add to Wishlist] button. |
| Booking | SmartnewsAds.p(“your pixel tag ID”, “Booking”) | When a reservation or booking is made for a service, such as a hotel, flight, or event ticket. | |
| CompleteRegistration | currency, value | SmartnewsAds.p(“your pixel tag ID”, “CompleteRegistration”) | When a registration form is completed. Example: Someone submits a completed subscription or signup form. |
| Contact | SmartnewsAds.p(“your pixel tag ID”, “Contact”) | When someone initiates contact with your business via telephone, SMS, email, chat, etc. Example: Someone submits a question about a product. | |
| CustomizeProduct | SmartnewsAds.p(“your pixel tag ID”, “CustomizeProduct”) | When someone customizes a product. Example: Someone selects the color of a T-shirt. | |
| Donate | SmartnewsAds.p(“your pixel tag ID”, “Donate”) | When someone donates funds to your organization or cause. Example: Someone adds a donation for the Humane Society to their cart. | |
| Download | SmartnewsAds.p(“your pixel tag ID”, “Download”) | When a file, app, or other piece of digital content is downloaded. Example: Someone clicks a [Download] button for a white paper. | |
| FindLocation | SmartnewsAds.p(“your pixel tag ID”, “FindLocation”) | When someone searches for a location of your store via a website or app, intending to visit the physical location. Example: Someone wants to find a specific product in a local store. | |
| InitiateCheckout | content_ids, contents, currency, quantity, value | SmartnewsAds.p(“your pixel tag ID”, “InitiateCheckout”) | When someone enters the checkout flow prior to completing the checkout flow. Example: Someone clicks on a checkout button. |
| Lead | currency, valuecontent_ids are required for Dynamic Ads | SmartnewsAds.p(“your pixel tag ID”, “Lead”) | When a signup is completed or other event of interest is recorded. Example: Someone clicks on pricing or submits a lead form. |
| Login | SmartnewsAds.p(“your pixel tag ID”, “Login”) | When someone logs in to an existing account. | |
| Purchase | content_ids, content_type, contents, currency, quantity, valuecontent_ids, currency, value are required for Dynamic Ads | SmartnewsAds.p(“your pixel tag ID”, “Purchase”) | When a purchase is made or checkout flow is completed. Example: Someone has finished the purchase or checkout flow and lands on the purchase confirmation page. |
| Schedule | SmartnewsAds.p(“your pixel tag ID”, “Schedule”) | When someone books an appointment to visit one of your locations. Example: Someone selects a date and time for a tennis lesson. | |
| Search | content_ids, content_type, contents, currency, search_string, value | SmartnewsAds.p(“your pixel tag ID”, “Search”) | When a search is made. Example: Someone searches for a product on your website. |
| Share | SmartnewsAds.p(“your pixel tag ID”, “Share”) | When someone shares content from your site or app via a share button or other mechanism. | |
| SignUp | SmartnewsAds.p(“your pixel tag ID”, “SignUp”) | When someone signs up for an account (pre-registration) but may have not yet completed a full registration. | |
| StartTrial | currency, predicted_ltv, value | SmartnewsAds.p(“your pixel tag ID”, “StartTrial”) | When someone starts a free trial of a product or service you offer. Example: Someone starts a free trial for your game. |
| SubmitApplication | SmartnewsAds.p(“your pixel tag ID”, “SubmitApplication”) | When someone applies for an offered product, service, or program. Example: Someone applies for a credit card, educational program, or job. | |
| SubmitForm | SmartnewsAds.p(“your pixel tag ID”, “SubmitForm”) | When someone submits a form (e.g., contact form or survey) that is not covered by other events. | |
| Subscribe | currency, predicted_ltv, value | SmartnewsAds.p(“your pixel tag ID”, “Subscribe”) | When someone applies to start a paid subscription for a product or service you offer. Example: Someone subscribes to your streaming service. |
| TimeSpent | SmartnewsAds.p(“your pixel tag ID”, “TimeSpent”) | When the time a user spends on a page or screen is tracked and meets a threshold you define | |
| ViewContent | content_ids, content_type, contents, currency, valuecontent_ids are reuiqred for Dynamic Ads | SmartnewsAds.p(“your pixel tag ID”, “ViewContent”) | A visit to a relevant web page (Example: a product page or landing page). ViewContent tells you if someone loads a web page on their browser, but not what they see or do on that page. Example: Someone lands on a product details page. |
| VisitCart | SmartnewsAds.p(“your pixel tag ID”, “VisitCart”) | When someone views their shopping cart or basket page |
Standard event parameters
These parameters are optional, JSON-formatted objects that you can include and associate with standard events. They allow you to track additional information about your website visitors’ actions. Once tracked, parameters can be used to further define any custom audiences you create. For example, when “Purchase” is tracked as a standard event, it’s usually worthwhile to track and send additional parameters such as product IDs, categories, and the number of products purchased, along with the total transaction value.
Parameters supported by SmartNews standard events:
| Field | Format | Example | Description |
|---|---|---|---|
| content_category | String | electronics | Category of the page or product |
| content_ids | Array of Integers or String | [12345, ‘A67890’] | Product IDs associated with the event, such as SKU numbers |
| content_name | String | special product A | Name of the page or product |
| content_type | String | product or product_group | Either the product or product_group based on the content_ids or contents being passed. If the IDs being passed in content_ids or contents parameter are IDs of products, then the value should be product. If product group IDs are being passed, then the value should be product_group. If no content_type is provided, SmartNews will match the event to every item that has the same ID, independent of its type. |
| contents | Array of objects | [{‘id’: ‘ABC123’, ‘quantity’: 2}, {‘id’: ‘XYZ789’, ‘quantity’: 2}] | An array of JSON objects that contains the quantity and product or content identifier(s). id and quantity are the required fields. |
| currency | String | JPY | The currency for the value specified, such as JPY, USD, EUR |
| quantity | Integer | 2 | The number of items when checkout was initiated. |
| predicted_ltv | Integer, float | 12000.5 | Predicted lifetime value of a subscriber as defined by the advertiser and expressed as an exact value. |
| search_string | String | wireless earbuds | Used with the Search event. The string entered by the user for the search. |
| status | Boolean | true | Used with the CompleteRegistration event. Returns true when the user completes full registration, and false otherwise. |
| value | Integer or float | 39.99 | The monetary value of a user performing this event to the business. |
| time_spent | Integer | 10000 | Time a user spends on the page in milliseconds. |
<!-- SmartNews Ads Pixel Code -->
<script type="text/javascript">
!function () {
if (window.SmartnewsAds = window.SmartnewsAds || {}, !window.SmartnewsAds.p) {
var e = window.SmartnewsAds.p = function () {
e.callMethod ? e.callMethod.apply(e, arguments) : e.queue.push(arguments)
};
window.SmartnewsAds._p || (window.SmartnewsAds._p = e), e.push = e, e.version = "1.0.0", e.queue = [];
var n = document.createElement("script");
n.async = !0, n.src = "https://cdn.smartnews-ads.com/i/pixel.js";
var s = document.getElementsByTagName("script")[0];
s.parentNode.insertBefore(n, s)
}
}();
SmartnewsAds.p("[pixel ID]", "Purchase", {
"currency": "JPY",
"event_value": 600000,
"content_ids": [400, 401, 402],
"content_type": "item"
});
</script>
// Choice 1
<noscript>
<img height="1" width="1" style="display:none;" alt="" src="https://i.smartnews-ads.com/p?id=[pixel ID]&e=[event name]" />
</noscript>
// Choice 2
// one "&d%5B[additional_parameter_key]%5B=[additional_parameter_value]" will only represents one pair of key value.
// example for above will be:
// https://i.smartnews-ads.com/p?id=[pixel ID]&e=[event name]&d%5Bcurrency%5B=JPY&d%5Bevent_value%5B=600000&d%5Bcontent_ids%5B=400&d%5Bcontent_ids%5B=401&d%5Bcontent_ids%5B=402
<noscript>
<img height="1" width="1" style="display:none;" alt="" src="https://i.smartnews-ads.com/p?id=[pixel ID]&e=[event name]&d%5B[additional_parameter_key]%5B=[additional_parameter_value]" />
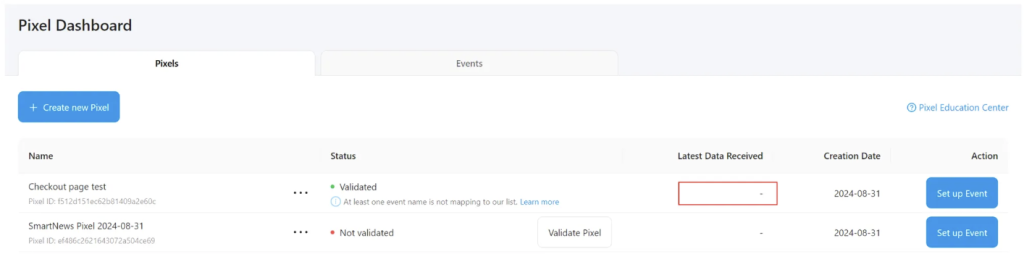
</noscript>Validating Pixels
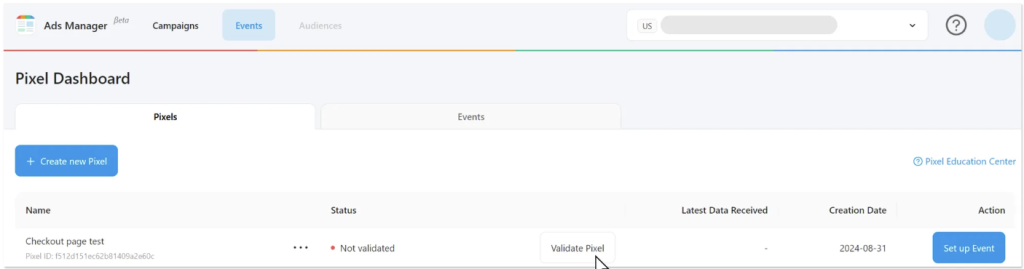
You can test if a Pixel is set up on your website correctly by selecting Validate Pixel under the Pixels tab. This opens the Pixel validator.
Enter the web page where your Pixel’s event code is installed and select Open & validate.
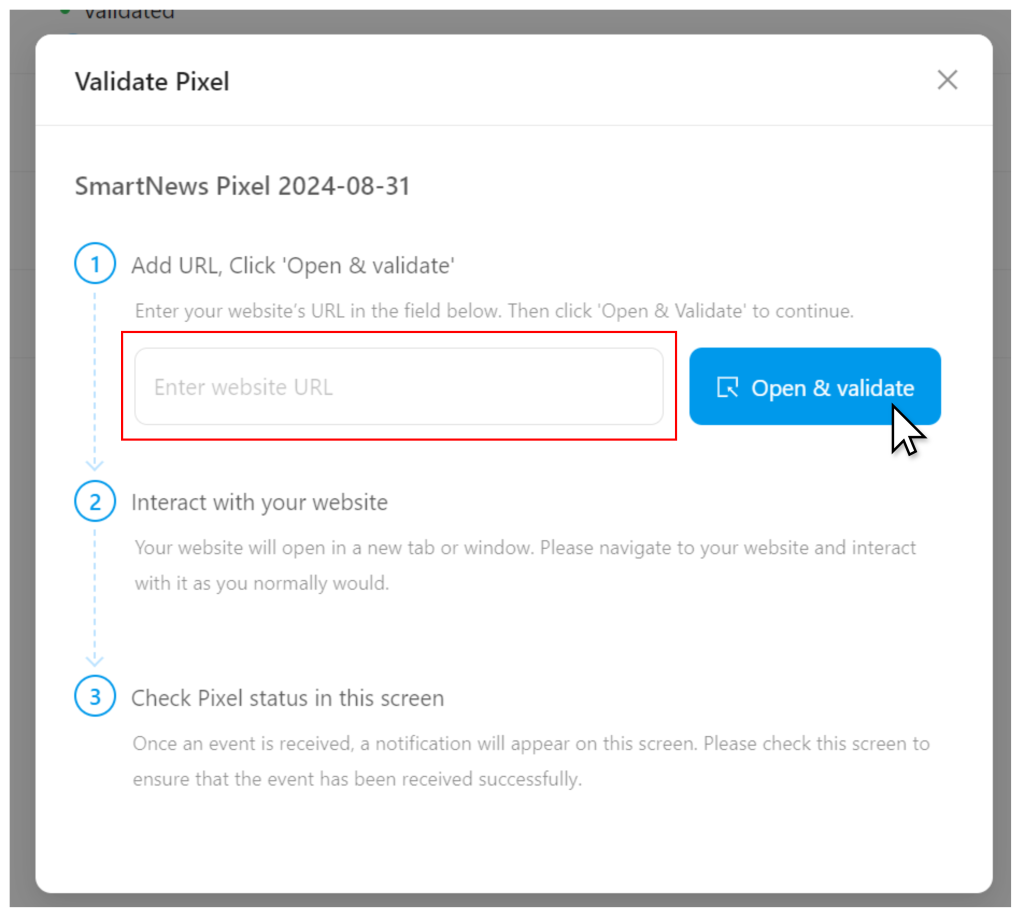
If your base code and event codes are set up correctly, you should see the following message at the top of the validator window:

Validating Pixels on dynamic pages
When setting up Pixels on dynamic pages like an ASP.NET page, the Pixel validator might mistakenly report that the Pixel hasn’t fired. For dynamic pages like these, specific user actions may be required that the validator can’t test for using just a URL.
In such cases, you can verify if a Pixel has fired by checking the “Last Event Received” column under the Events tab. If you see events being recorded after an action is completed, your Pixel is implemented correctly.
If you need to use the same event code for multiple URLs, we recommend disabling all the event codes and testing each one individually.