
リストの作成について
SmartNewsではPixel(ピクセル)タグを用いて、タグが埋まっているページを訪問したユーザーのリストを作成することができます。
サイトを訪問したユーザーのリストや、すでにコンバージョン(CV)したユーザーの除外リストなどを作り、広告配信の効率化に活用いただけます。
データソース
貴社サイトに設置されたPixelタグ
Pixelタグは管理画面から取得することができます。
PixelタグのID、イベント、URLを条件として設定できます。
関連資料
セグメント
条件を満たしたユーザーのセグメントを作成します。
URLは”部分一致”として取り扱われます。
マッチさせるURLの設定方法
正規表現で指定が可能です。以下は一例です。(詳細については、一般的な正規表現の説明文書をご参照ください)
- ^http://example.com/$ 完全一致
- ^http://example.com/ 前方一致
- http://example.com/ 部分一致
※「^http://example.com/」ではなく「http://example.com」を使った場合には部分一致となります。 例えば「http://app.example.com/login?redirect=http://example.com」 にもマッチします。意図しないケースにマッチしないようご注意ください。
利用可能なユーザー情報
Pixelタグを設置したページの来訪者
例)商品LP(ランディングページ)閲覧者・申込みフォームページ閲覧者・購入完了者 など
有効データ期間
過去90日分まで
設定方法
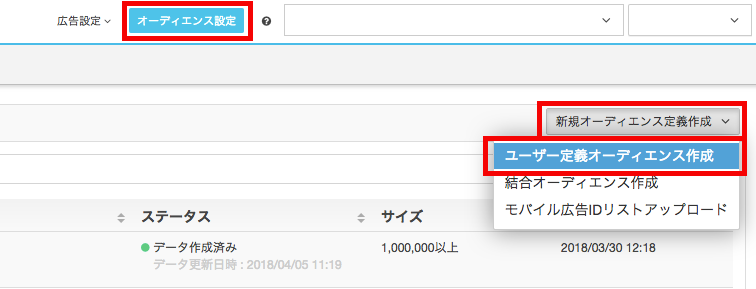
TOPページ>オーディエンス設定>ユーザー定義オーディエンス作成>TYPE:ウェブサイト
1[オーディエンス設定]を押下します。
2[新規オーディエンス定義作成]を押下します。
3[ユーザー定義オーディエンス作成]を押下します。
4条件のTYPEのプルダウンから[ウェブサイト]を選択します。
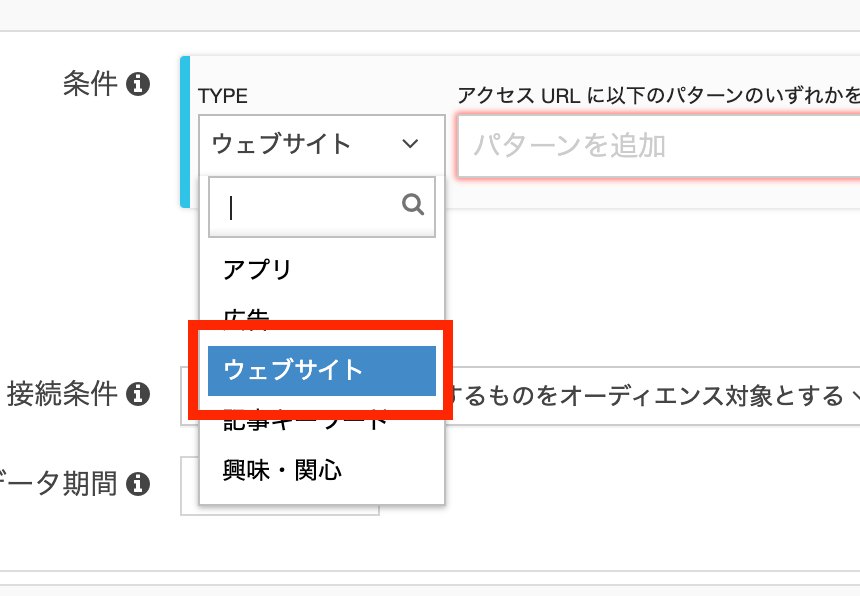
※有効データ期間を変更した後にオブジェクトを選択するとイベントがプルダウンで表示されます。
5アクセスURLに任意のURLを選択します(部分一致/正規表現をご利用できます)。
※Pixelタグを設置するURLはhttp/httpsのどちらもマークが貯まります。
6接続条件、有効データ期間、名称、説明を入力します。
※名称はユーザー様の管理用となるため配信に使用されることはありません。
※説明は任意となるため必須ではありません。

7[この内容で作成]を押下します。
8作成したオーディエンスをキャンペーンに設定 します。
※オーディエンスデータのステータスが作成済みになったらキャンペーン作成画面で設定可能です。
注意事項
- 事前にPixelタグを発行し、対象となるページへ設置したのちにオーディエンス作成をすると、マークがたまります。
- Pixelタグを使用したターゲティングの変更は、Pixelタグを発行した管理画面ログインID(メールアドレス)からのみ変更が可能です。オーディエンスの設定変更ができない場合、発行をしたメールアドレスでログイン後、オーディエンスの設定変更をお願いします。
- Pixelタグ発行者とオーディエンス作成者が別の場合も、作成は可能ですがデータは貯まりませんのでご注意ください。
- 管理画面とオーディエンスの更新にはタイムラグが発生するため、管理画面上では数値が上がっていてもオーディエンスサイズは貯まっていないことがあります。
- 既存の広告アカウントで作成したPixelタグの他広告アカウントへの移管はできません。
