
管理画⾯のログインから広告マネージャー v2へのアクセス⽅法、配信設定、審査、配信開始までの⼀連のフローです。
広告マネージャー v2へのアクセス方法
① 管理画面へのログイン
ワンタイムパスワードを使ってログインする
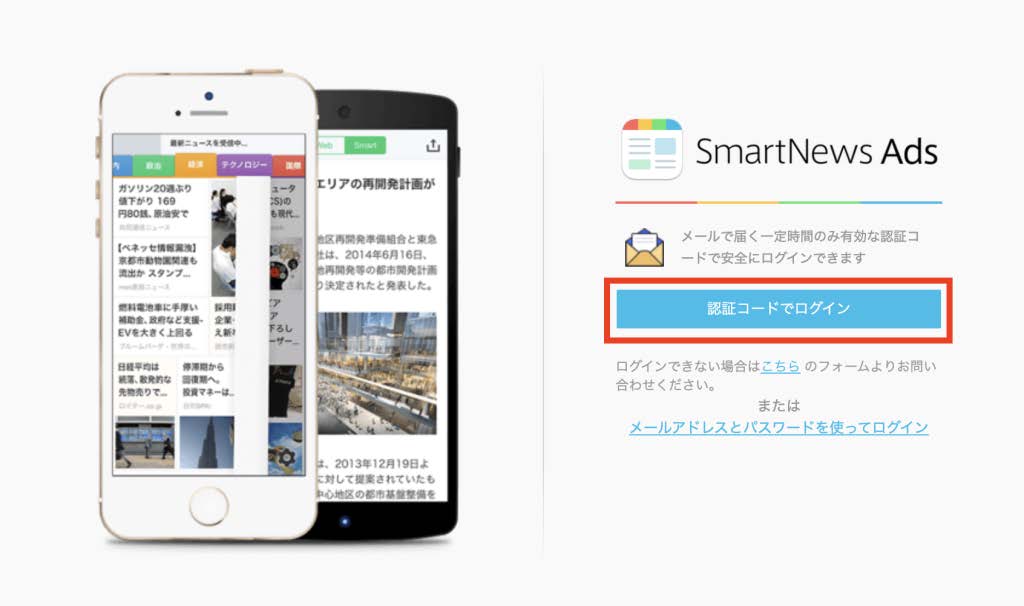
- トップログインページ(https://ads.smartnews.com/login)を開き、[確認コードでログイン]ボタンを押下し、ワンタイムパスワードの発⾏ページに進みます。
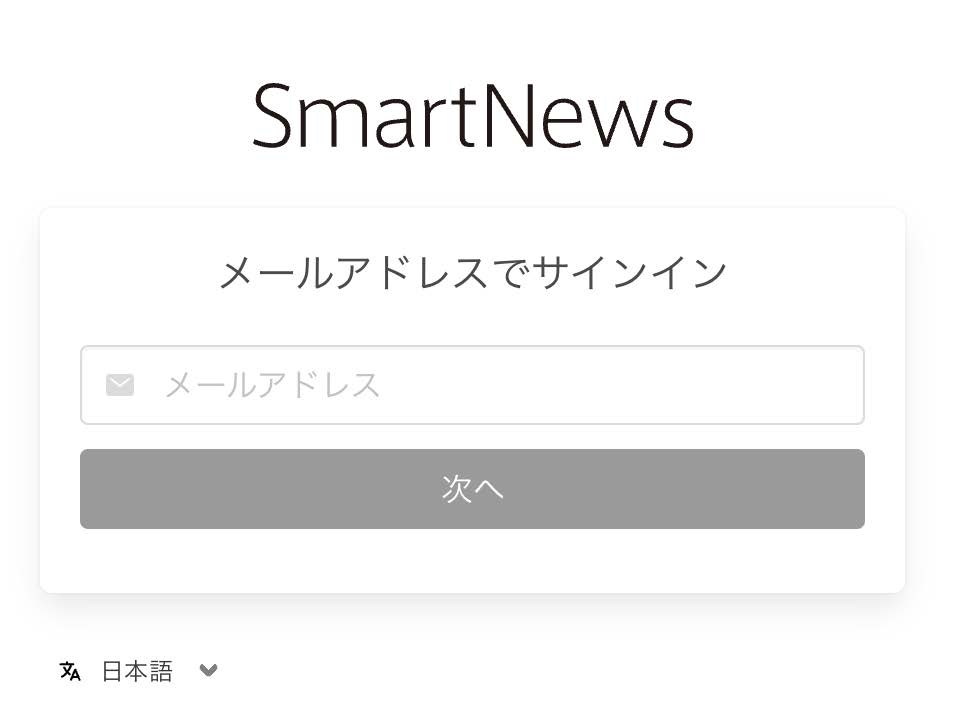
- メールアドレスを記⼊し、[次へ]ボタンを押すと、ワンタイムパスワードがメールで届きます。
- ワンタイムパスワードを⼊⼒し、ログインします。
※複数のPCから同じメールアドレス(メーリングリストなど)でワンタイムパスワードを発⾏し、ログインに複数回失敗すると、数時間の間アカウントがロックされます。
ロックされた場合は時間を置いてからアクセスをお願いします。
※広告マネージャーへのアクセスはPCからのみ可能です(スマートフォンからのログインには対応しておりません)。
注意事項
メールアドレス・パスワードを使ってのログインはできません。
もし、メールアドレス・パスワードを使ってログインされた場合、広告マネージャー v2の管理画⾯に⼊れませんので、サイトアウトしてから「確認コードでログイン」より再度ログインしてください。
二段階認証は推奨しておりません。解除方法は「ログイン時の二段階認証について」をご参照ください。
② 広告マネージャー v2へのリンクを押下
[広告マネージャー v2]へのリンクを押下して下さい。
なお、メールアドレス・パスワードを使ってログインしている場合や、広告主のアカウントが広告マネージャー v2へのアクセスが許可されていない場合には、[広告マネージャー v2]の⽂字は表⽰されません。

⼀度ログインすると、次回以降、ads.smartnews.com/am/ から直接広告マネージャー v2にアクセスすることもできます。
③ 広告主のアカウントを選択
広告マネージャー v2アクセス後、管理画⾯トップページが開きます。
ユーザーに紐づいている広告アカウントが⼀覧で表⽰されるので、キャンペーン作成したい広告主名を選択してください。

配信開始までの一連のフロー
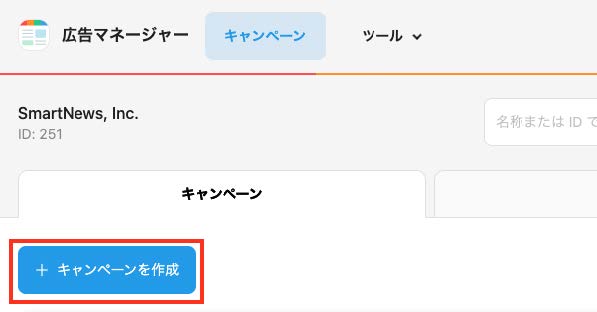
④ キャンペーン作成
[キャンペーンを作成]ボタンからキャンペーン作成画⾯に進みます。
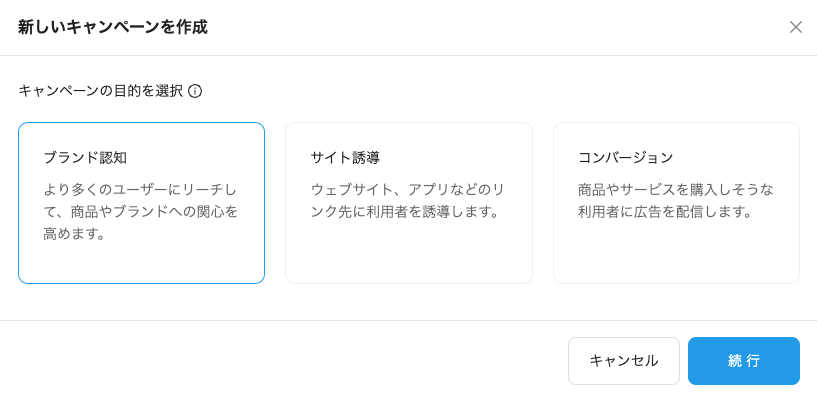
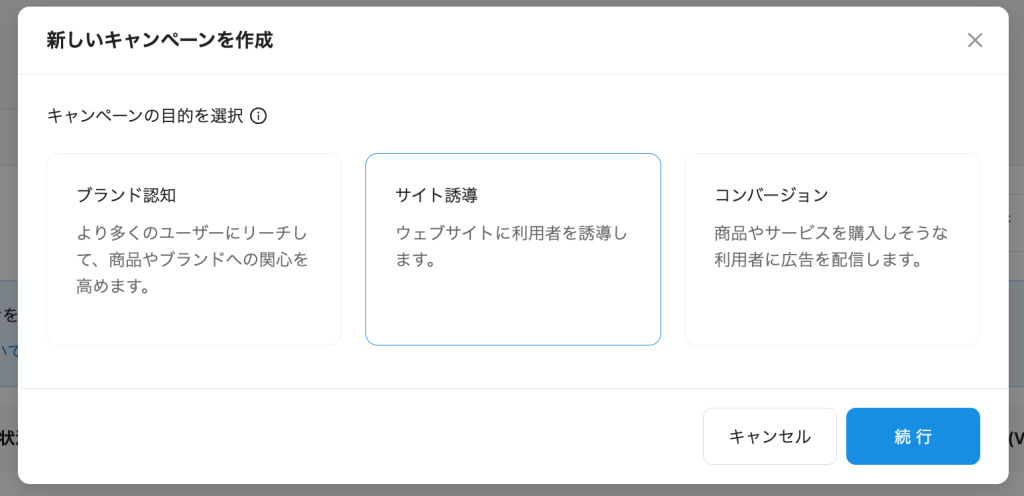
⑤ キャンペーン目的選択
キャンペーンの⽬的に応じて最適なものを選択し、[続⾏]を押下します。
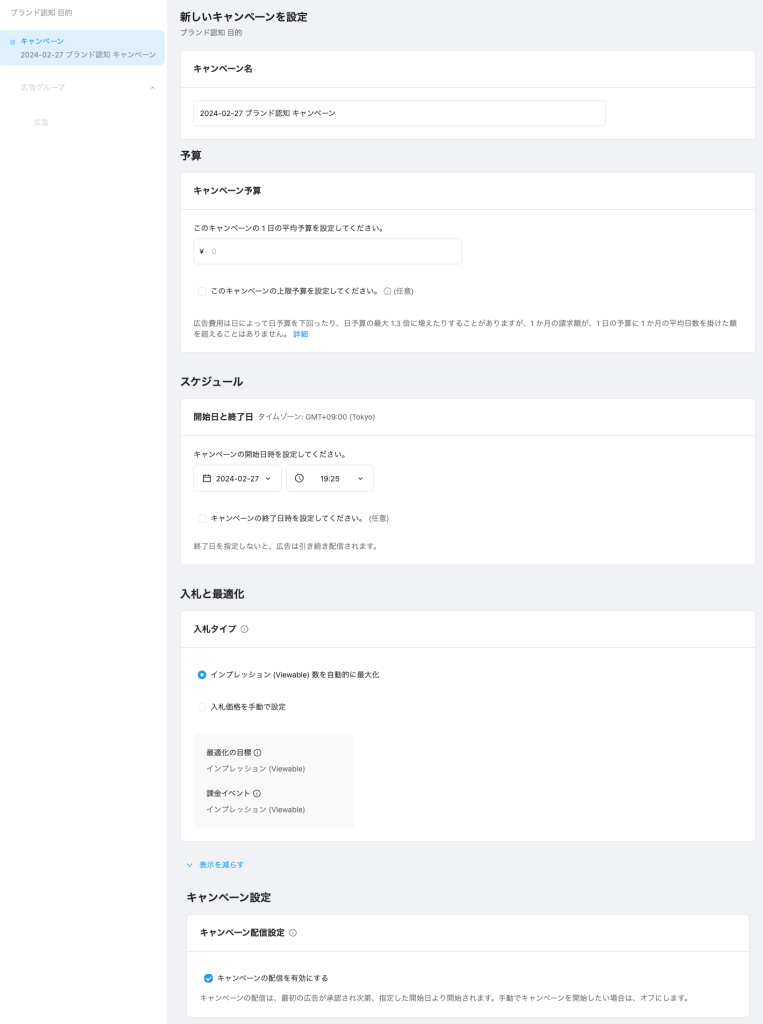
⑥ キャンペーン設定
キャンペーン情報の設定をします。
ブランド認知キャンペーン
サイト誘導キャンペーン
コンバージョンキャンペーン
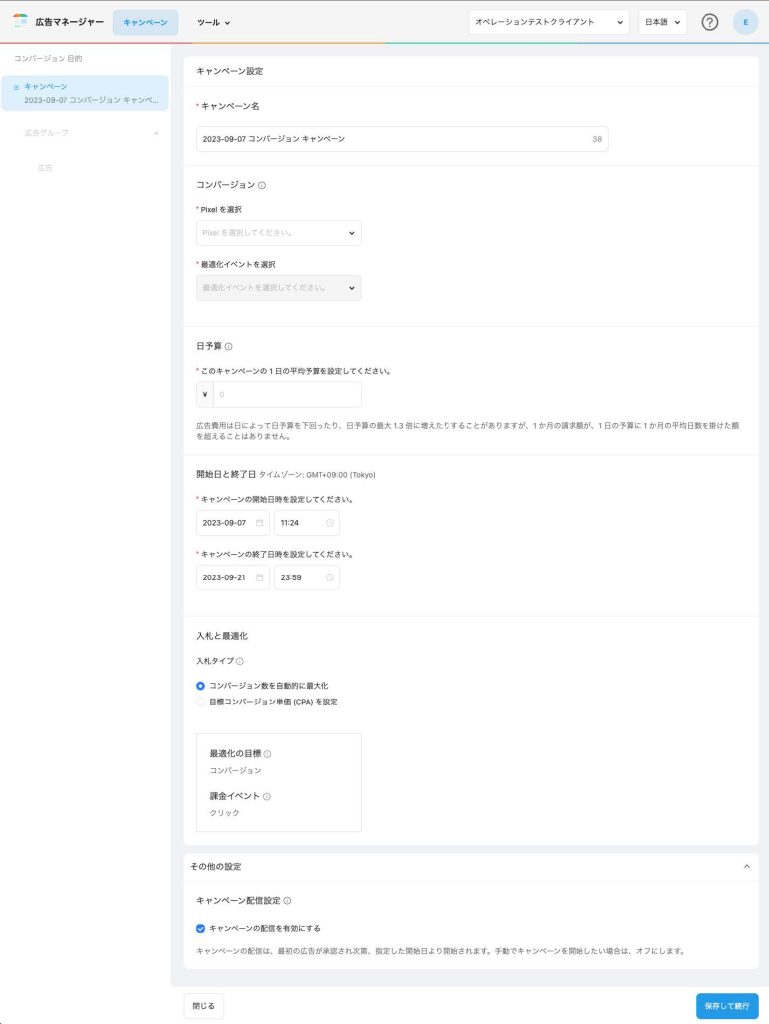
キャンペーン情報⼊⼒完了後[保存して続⾏]を押下してください。
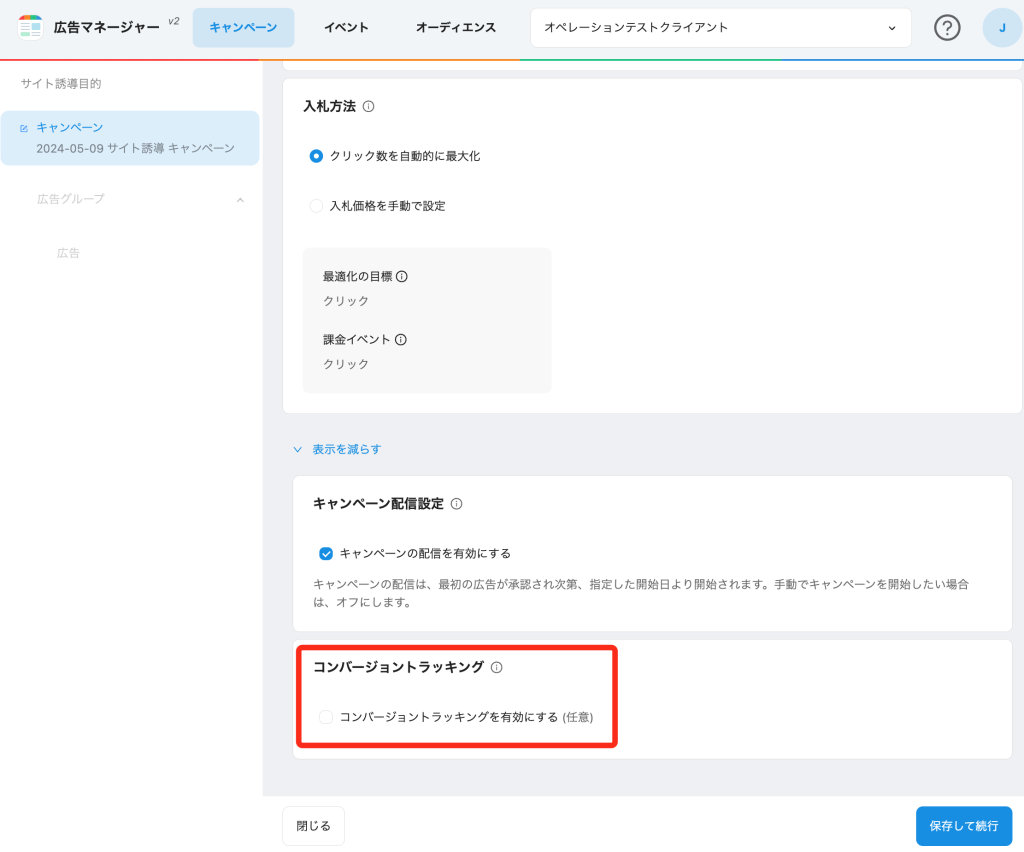
注意事項
- キャンペーンの配信は、最初の広告が承認され次第、指定した開始⽇より開始されますが、⼿動でキャンペーンを開始したい場合は、「その他の設定」より、「キャンペーンの配信を有効にする」のチェックボックスをOFFにします。
- キャンペーンを作成し、広告が承認され、配信が可能になった状態で配信開始時間の60分前を過ぎた場合、開始日時を編集できなくなります。
- キャンペーン開始後は、日予算、終了日時、入札タイプ、単価(入札タイプが手動設定の場合)を変更することが可能です。
概要
広告マネージャー v2では、Pixelタグ(ピクセルタグ)を使用してブランド認知キャンペーンとサイト誘導キャンペーンにおいても、コンバージョンを計測することが可能です。Pixelとは、ウェブサイトに追加されるコードによって、特定のイベントがユーザーにトリガーされるたびに広告マネージャーがそれを検出できるようにするものです。
コンバージョンキャンペーンでは常にPixelが必要ですが、ブランド認知およびサイト誘導キャンペーンでは任意です。
設定手順
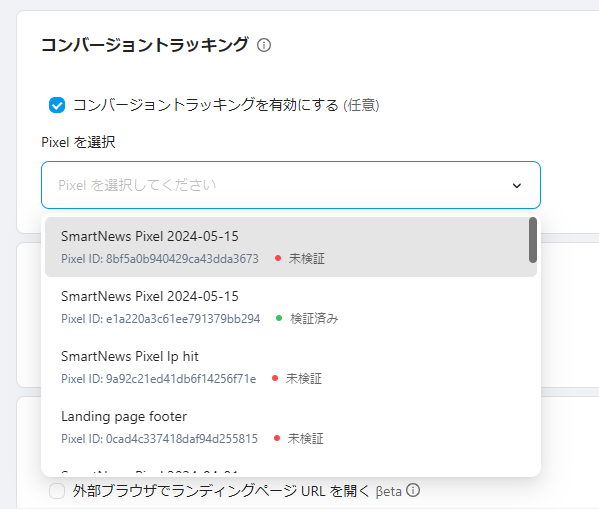
コンバージョントラッキングの設定方法
1まだPixelを発行していない場合は、Pixelを作成し、イベントタイプを選択します。
2新規ブランド認知・サイト誘導キャンペーンを作成します。
3キャンペーン設定画面の一番下、「さらに表示」をクリックします。
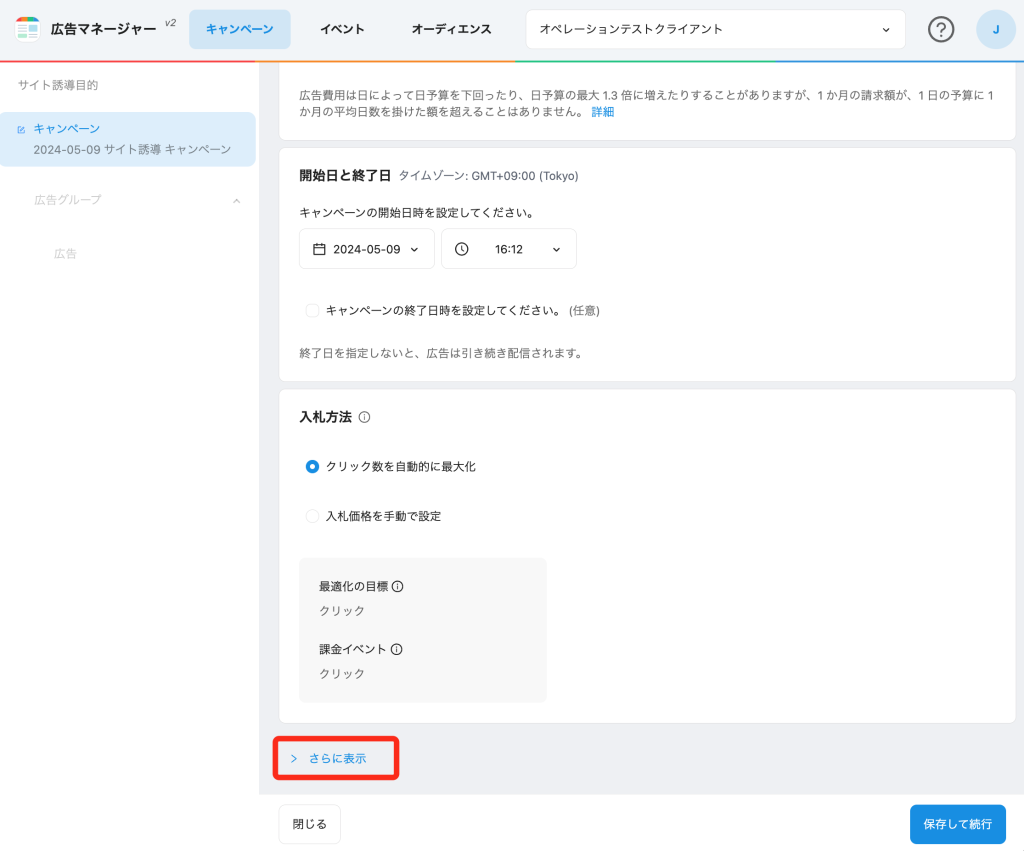
4「コンバージョントラッキングを有効にする(任意)」を選択します。
5追跡したいイベントのPixelを選択します。
一度キャンペーンで広告が配信されると、Pixelの設定を変更することはできません。以下の手順は新しいキャンペーンのみに適用されます。
通常は、新しいPixelは最初は検証されません。イベントが正常に発火すると、Pixelは自動的に検証されます。
6新規キャンペーンを保存し、広告グループ・広告の入稿設定へ進みます。
FAQ
Q: コンバージョンが計測されていません。どうすればいいですか?
A: Pixelのイベントが正しく発火していない可能性があります。
Pixelのイベントコードがサイトのヘッダーに正しく追加されているか確認してから、検証チェックを実行します:
- 広告マネージャーの上部にある[イベント]タブの下で、検証したいPixelの隣にある[Pixelを検証]を選択します。
- Pixelベースコードとイベントコードが貼り付けられているページのURLを入力します。
- [ウェブサイトを開く]を選択します。ページが開き、広告マネージャーがPixelイベントが正しく発火されたかどうかを確認します。

上記のエラーが表示された場合は実装されたPixelベースコード、もしくはイベントコードに問題がある可能性があります。
Q: Pixelを選択できないのはなぜですか?
A: キャンペーンが開始してしまうと、Pixelの選択や設定変更を行うことができません。新しいキャンペーンを作成してPixelを選択してください。
Q: 同じPixelに複数のイベントが紐づけられている場合、すべてのイベントを計測できますか?
A: はい、選択されたPixelによって発火されたすべてのイベントが計測されます。
Q: ブランド認知・サイト誘導キャンペーンの計測されたコンバージョン結果はどこで見ることができますか?
A: [キャンペーン]タブを選択し、[表示項目:シンプル]に設定されている場合は[表示項目:標準]を選択します。

これにより、各キャンペーンで発火したすべてのイベントの内訳を見ることができます。イベントのパフォーマンスもダウンロードされたレポートに含まれます。
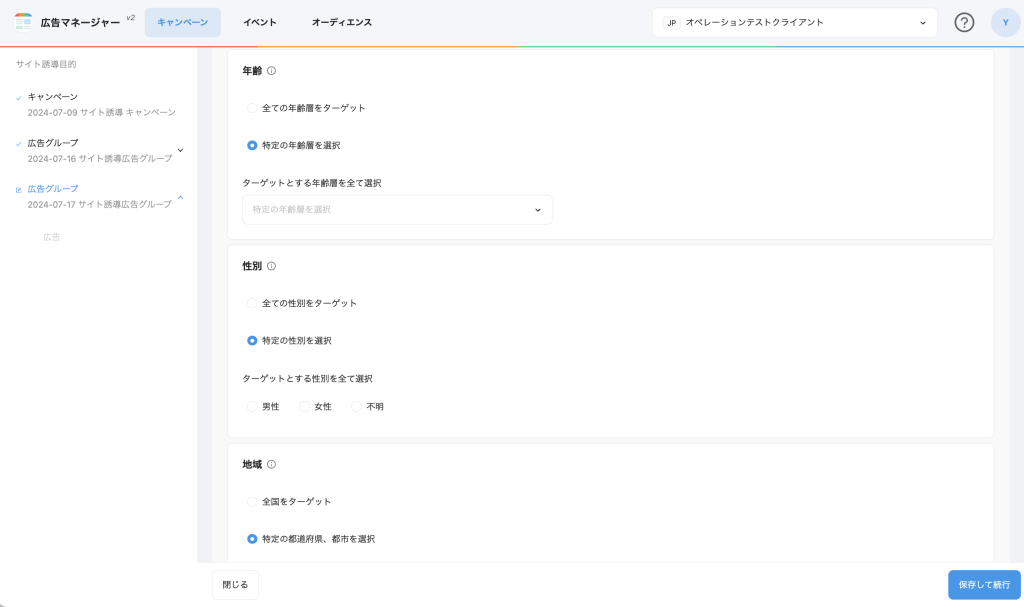
⑦ 広告グループ設定
ターゲティング情報を設定します。
広告グループでは「年齢」・「性別」・「地域」・「興味関心」・「配信OS」等のターゲティングの設定が可能です。
ターゲティングの最適化方法を選択する
広告グループを作成する際、2種類の最適化方法から選択できます。
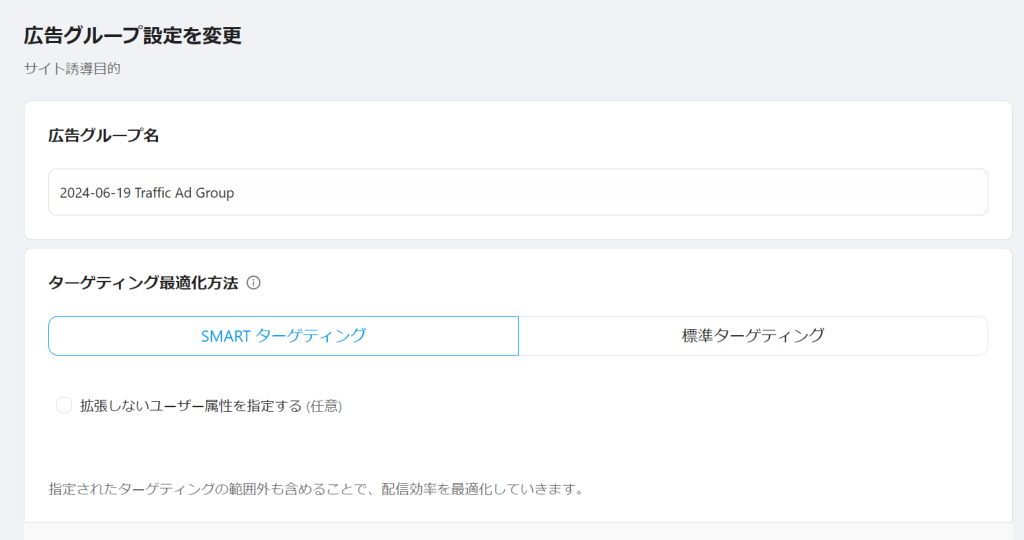
- SMARTターゲティング
- SMARTターゲティングは、キャンペーンの目的、広告のパフォーマンス、製品内容などを基に自動的にターゲティング設定を拡張します。 「ブランド認知」のキャンペーンではSMARTターゲティングは利用できません。
- 標準ターゲティング
- 指定したターゲティング設定に基づいて広告を配信します。ユーザーのデータが限られているため、SMARTターゲティングに比べてインプレッション数が少なくなる可能性があります。
注意事項:厳格な年齢制限を設定したい場合
「SMARTターゲティング」では除外設定したオーディエンスに配信される可能性があるため、配信する年齢を限定する必要がある広告には、「標準ターゲティング」を必ず使用してください。
広告グループ情報⼊⼒完了後[保存して続⾏]を押下してください。
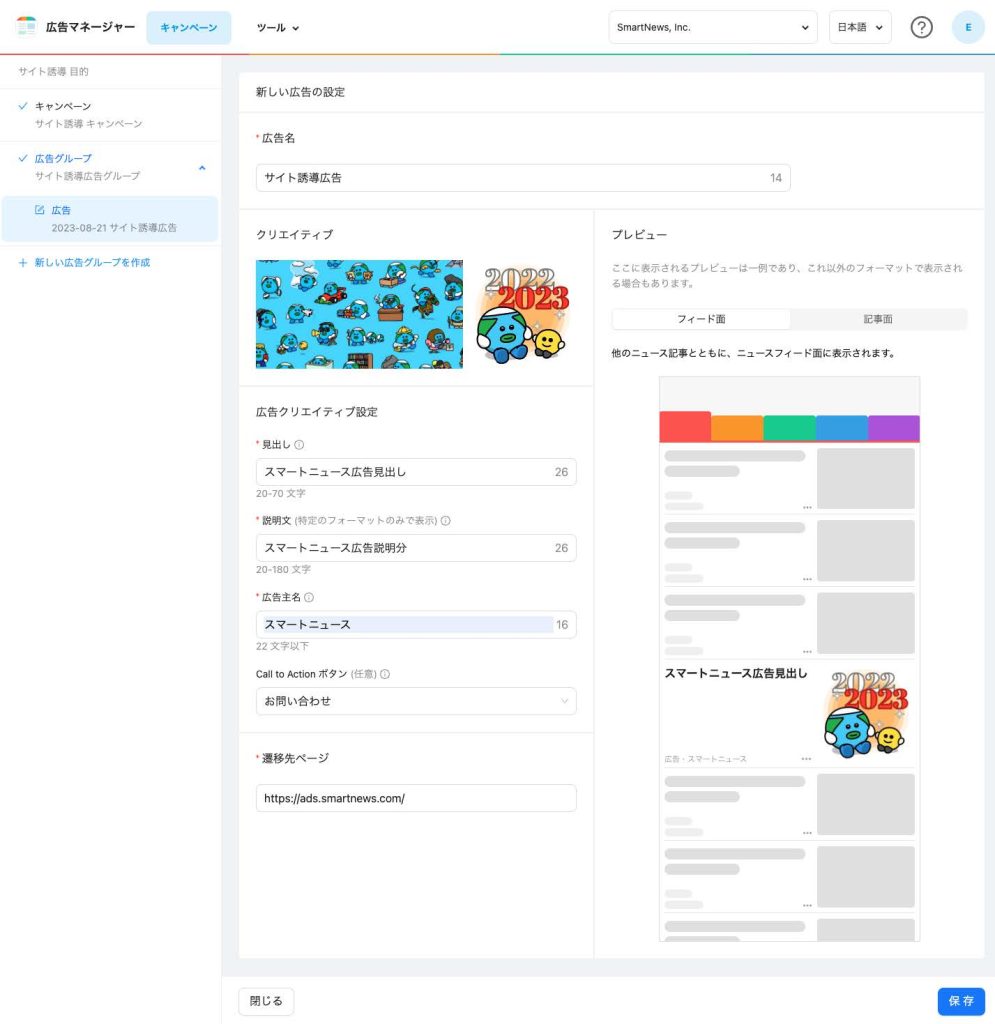
⑧ 広告クリエイティブ入稿
広告フォーマットを選択して、広告クリエイティブを設定します。
注意事項
プレビューは実際の配信表示と異なる場合があります。広告はSmartNewsアプリで配信され、ランディングページはアプリ内ブラウザで表示されます。配信時にURLにパラメータが付与されたり、URLエンコード変換が行われたりすることがあります。
表示や遷移に関する予期せぬ問題を防ぐため、実際のSmartNewsアプリのモバイル環境での動作確認を推奨します。
広告フォーマットを選択する
3種類の広告フォーマットから選択することができます。
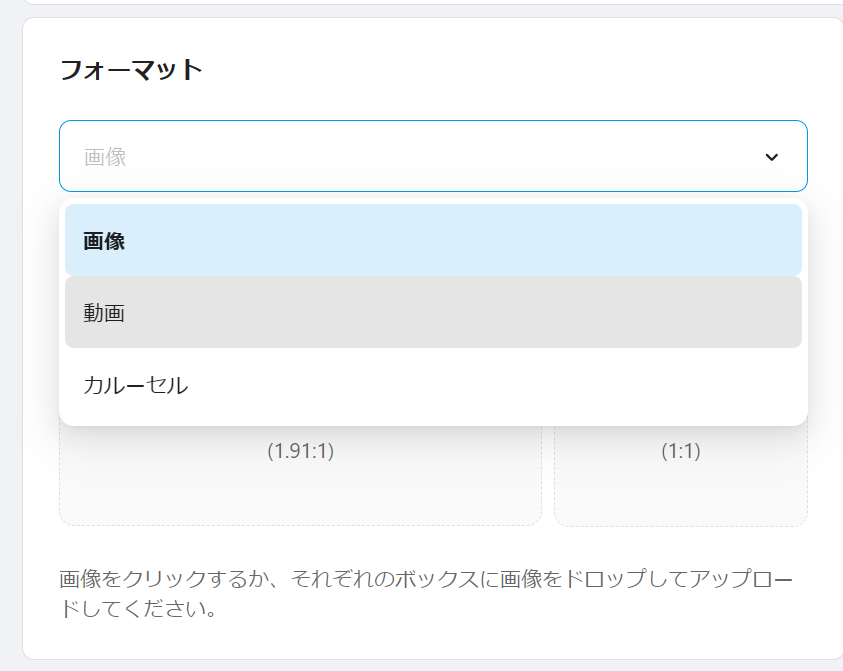
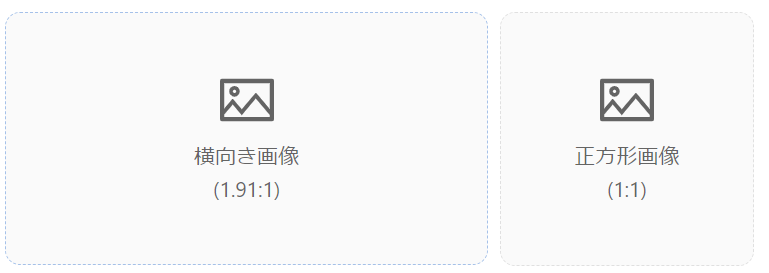
- 画像
- 静止画のフォーマットです。配信面や端末環境によって、横向きまたは正方形で表示されることがあります。
- 対応形式:JPEG、PNG、GIF (静止画のみ)
- 対応サイズ:5MB 以下
※当社サーバー上で消費されるディスク容量となりますので、ファイルサイズ自体は5MBより若干小さいサイズとなります。広告管理画面でアップロードし、エラーが出ないことをご確認ください。
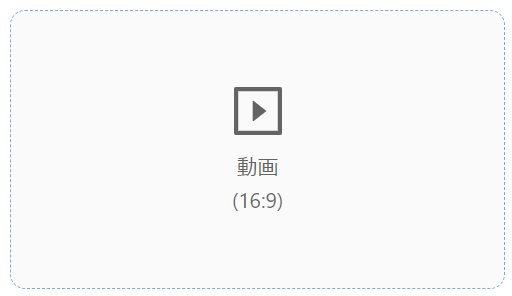
- 動画
- 16:9の動画ファイルを用いた動画広告を作成します。同じサイズの静止画サムネイルファイルは任意です。
- 動画の再生時間は1分以内とします。
- 対応形式:MP4
- 対応サイズ:100MB 以下
- カルーセル
- 複数の静止画を一つの広告枠に表示するためのフォーマットです。ユーザーが広告を横にスクロールすると、広告の画像が順に表示されます。
- 各カルーセルの画像の下には見出しテキストも表示されます。
- 対応形式:JPEG、PNG、GIF(静止画のみ)
- 対応サイズ:5MB 以下
必要な入稿ファイル
| 画像 | 動画 | カルーセル | |
|---|---|---|---|
| ファイル数 | 2個 | 1個 | 3~10個 |
| ファイル種類 | ・横向き画像(1.91:1) -推奨サイズ:1200×628pixel以上 ※最低サイズ:600×314pixel ・正方形画像(1:1) -推奨サイズ:600×600pixel以上 ※最低サイズ:300×300pixel | ・動画ファイル(16:9) ・サムネイル画像(16:9)(任意) -推奨サイズ:1280×720pixel以上 ※最低サイズ:640×360pixel | ・正方形画像(1:1) -推奨サイズ:600×600pixel以上 ※最低サイズ:300×300pixel |
見出しと説明文の注意点
- 全角スペースや連続した半角スペースは使用できません。
- 文章の前後にスペースや空白文字を入れないでください。文章の前後のスペースや空白文字は自動で削除される場合があります。
⑨ キャンペーン審査申請
広告のキャンペーン設定およびクリエイティブ⼊稿を終えただけでは配信がされません。
審査を通過したクリエイティブのみ広告掲載可能となります。
審査申請はキャンペーンごとの審査となるため、複数のクリエイティブを⼊稿した場合は、対象キャンペーン内のすべてのクリエイティブが審査対象となり、審査承認されたクリエイティブのみ配信が可能となります。
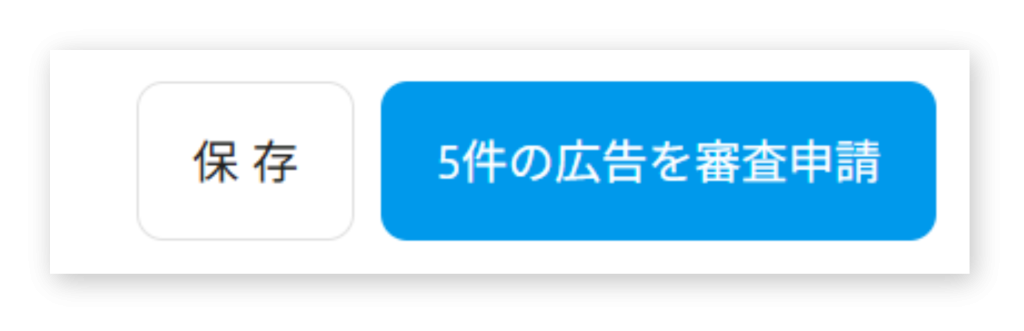
広告を一括で審査申請する
広告作成完了後に、広告編集画面の右下にある[保存]ボタンを押下すると、審査申請可能な広告をまとめて申請できるボタンが表示されます。このボタンを押すと、申請可能なすべての広告が申請され、編集ができなくなります。
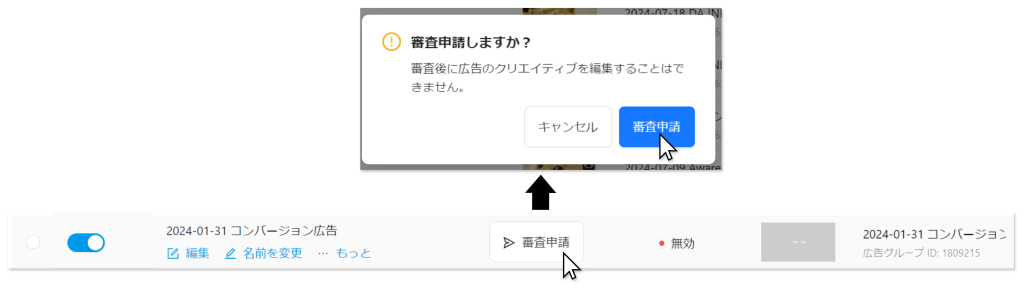
広告一覧から広告を1件ずつ審査申請する
広告タブから、[審査状況]列下の[審査申請]ボタンを押下し、確認画面上の[審査申請]を押下してください。
これにより、広告の審査状況が「審査中」に変更されます。
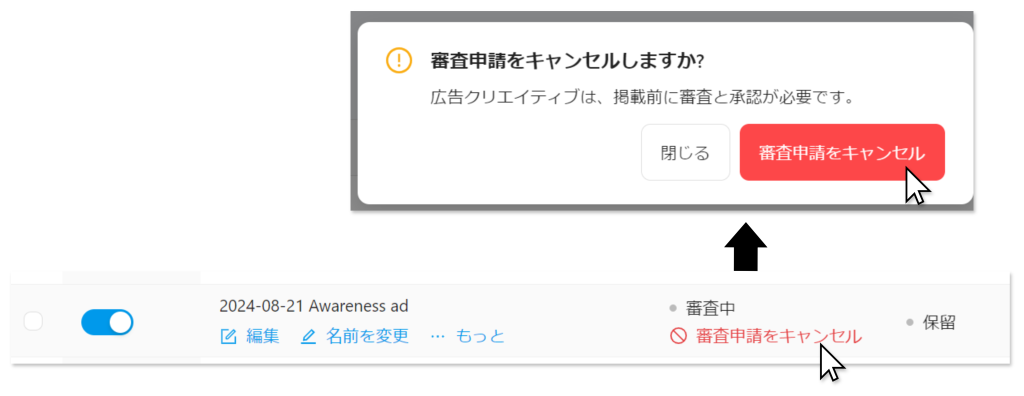
審査申請をキャンセルする
[審査状況]の項目にカーソルを合わせると、[審査申請をキャンセル]ボタンが表示されます。このボタンを押下すると、審査状況が「審査前」に戻ります。
承認状況の説明
広告マネージャー v2およびダウンロードしたレポートに表示される申請状況と審査状況のラベル名について、以下の通りとなります。
submission_status(申請状況)
| 申請状況 | レポート上の項目名 | 説明 |
|---|---|---|
| 申請前 | BEFORE_SUBMISSION | 審査申請前の広告、および審査申請をキャンセルした広告 |
| 審査中 | SUBMITTED | 審査申請された広告 |
moderation_status(審査状況)
| 審査状況 | レポート上の項目名 | 説明 |
|---|---|---|
| 審査前 | NOT_REVIEWED | 申請の有無にかかわらず、まだ審査が行われていない広告 |
| 承認済 | APPROVED | 審査を通過して承認された広告 |
| 不承認 | REJECTED | 規定違反などにより承認されなかった広告 ※一度承認された広告であってもユーザーレポートや規定変更の影響で承認が取り消される場合があります。 |
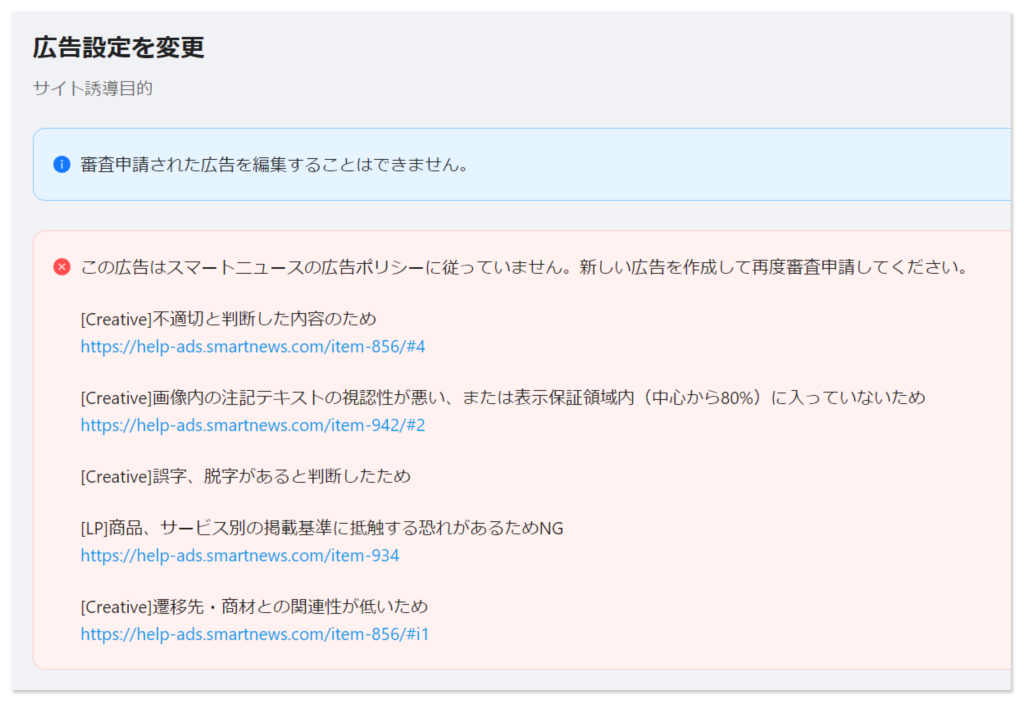
広告が不承認になった場合
キャンペーン審査が完了しましたら、メールで審査完了のご連絡をいたします。
SmartNewsの広告入稿規定(静止画・動画)に違反していると判断された広告は、「不承認」と表示されます。

不承認の理由を確認するには、該当する広告の編集画面を開いてください。
一度審査に申請された広告は再審査できません。不承認の理由に記載された内容を反映し、新しい広告を作成する必要があります。
⑩ 配信開始
キャンペーン・広告グループ・審査完了したクリエイティブの全てがONになった広告のみ配信されます。
